Thursday, June 27, 2013

What to Make with Cabbage

When someone hands you a cabbage, most likely you think coleslaw or cabbage soup.  I wanted coleslaw, but not just as your typical side.  My husband and I love mexican food, even more, we love tacos! Using the leftover chicken from earlier this week and adding a few other ingredients, we had AH-MAZING tacos!

I also made homemade whole wheat tortillas over the weekend, here is the recipe for them.  It makes store bought taste like wax, they are so well worth the effort! Here is the recipe for the tacos.
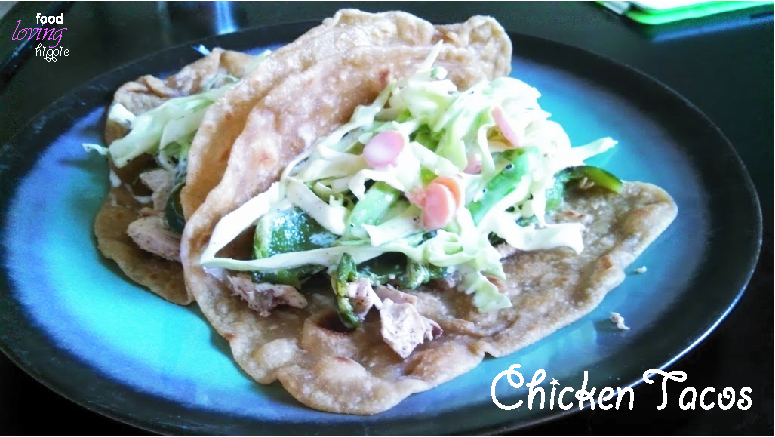

Chicken Tacos
(makes about 10 tacos)
adapted from Bobby Flay (foodnetwork.com)

Chicken:
Leftover roasted chicken rubbed with spices
2 tablespoons chili powder
2 teaspoons ground cinnamon
2 teaspoons ground cumin
2 teaspoons light brown sugar
2 teaspoons salt
1/2 teaspoon pepper
Oil

I spritzed a little oil on the chicken and rubbed the spices all over the chicken prior to baking.  I roasted it at 425 degrees fahrenheit for about 1 or 1-1/2 hours.  I used a digital thermometer to track it, I kept it in the oven until it reached 176 degrees, then pulled it out and let it rest.  It continued to cook until it reached the 180 you need.  Then pull off the chicken and either shred or chop it up!

Someone was a fan of the chicken....

Coleslaw:
1/2 cup organic mayo
1/4 cup plain greek yogurt
1 teaspoon celery salt (or use celery seed and add your own salt)
3 tablespoons apple cider vinegar
Pepper to taste
1 small head of cabbage, finely shredded or sliced
2 carrots, finely shredded
3 scallions, sliced thinly

Whisk together the mayo, greek yogurt, celery salt, apple cider vinegar, and pepper in a large bowl.  Toss in the cabbage, carrots, and scallions.  (I only had baby carrots on hand, so I sliced them thinly rather than trying to grate it).  Mix until the sauce evenly coats the veggies, and let it rest for about 15 minutes to let the flavors marinate.  You can keep it in the fridge if you like.

If you have reservations about using greek yogurt, try it in this recipe.  You really cannot taste it, greek yogurt is able to absorb the flavors around it, all I could taste was the mayo.  I like using greek yogurt with mayo because it lightens it up and cuts some of the fat.

Other Toppings:
1 avocado, sliced
2 poblano peppers, sliced

Slice up the avocados, sprinkle with lime juice and salt if you would like.  The lime will keep it from going brown.  I cooked the WHOLE poblanos on a skillet on medium high heat, with a light spritz of oil.  I put a top on it and let them steam.  You will hear them sizzle, but they will start to get a nice char on them.  Once they look almost cooked, pull them off the heat, but keep the top on.  Let them cool down and they will continue to steam until they are tender.  Once cooled a bit you can slice them up.


Once everything is done, assemble your tacos however you like! These were so good, I think my hubby ate them in point two seconds!


Wednesday, June 26, 2013

Asparagus, Lettuce and Tomato


When I was thinking of what to make with the asparagus I pulled out one of my favorite vegan cookbooks, "Skinny Bitch: Ultimate Everyday Cookbook" by Kim Barnouin.  I made this recipe before and my husband LOVED it.  I even wrote a note in the book so I would remember it!


Risotto is something I didn't try until I made it myself in my adult life, actually I believe this was the first recipe I ever made of risotto.  I am not anywhere near to be italian, so italian food didn't show up very much in our household.  Please know that risotto is a labor of love, you can't leave it unattended, and it takes a while to make. Make sure you cut out the time to make this, it would be a good Sunday dinner.

I didn't make this fully vegan, and I made a few adjustments to it to save on costs, from what I had in my cupboard and my tastes.  It actually calls for wild mushrooms and a array of different mushrooms, but I am not a fan of those, so I only used baby bella mushrooms.  Feel free to use any mushrooms you like! I paired it with the lettuce and tomatoes for an easy salad, with a simple homemade dressing.


Mushroom and Asparagus Risotto
(serves 6)


4 cups (32 oz container) organic vegetable broth
2 cups water
3 tablespoons olive oil (or any oil)
4 tablespoons butter (to make it vegan use Earth Balance)
1 8oz package of sliced baby bellas
1 bunch of asparagus, cut into 1" pieces
Salt & Pepper
2 garlic cloves, minced
1/2 large onion (or 1 small), diced
1 cup arborio rice, uncooked
1/3 cup white wine (I used leftover flat champagne-or this can be omitted)
1/2 cup shredded parmesan cheese, plus more for topping (use vegan cheese if you want it to be vegan)

1) In a large saucepan add the vegetable broth, cover and keep warm over low heat.  
2) In a large saute pan over medium-high heat, add 1 tablespoon olive oil and 1 tablespoon of butter.  Add the mushrooms and asparagus, and saute until lightly browned and crisp tender, about 10 minutes.  Season with salt and pepper to taste, remove from heat and transfer to a bowl.  
3) Using the same large saucepan, heat the remaining olive oil over medium heat and add the onion, stirring until soft, about 5 minutes.  Add the garlic and remaining butter and saute for 1 minute. 
4) Add the rice and stir until well combined.  Add the wine and stir until the wine is absorbed.  Add 1 cup of the warm broth to the rice and cook over medium heat, stirring constantly, until nearly absorbed.  
5) Continue adding the broth 1/2 cup at a time, stirring frequently and letting each additional broth be absorbed before adding more.  Continue adding the broth until the rice is tender and creamy, about 30-40 minutes.
6) Stir in the sauteed mushroom, asparagus, and parmesan cheese to the rice, and season it with salt and pepper to taste.  Feel free to garnish your plate with more parmesan, which hubby and I totally did...maybe we added more halfway through eating it...don't judge us!

I have to add this too, a very happy hubby eating tomatoes, which he totally doesn't like tomatoes, but loved the fresh organic ones we got from our share!


Tuesday, June 25, 2013

Swiss Chard & Beets


Last night for dinner I used the swiss chard and beets from my weekly share of produce to make two separate side dishes.  With the swiss chard I made sauteed swiss chard with bacon and onions, and with the beets I made ginger orange beets.  I roasted a chicken as the main, and will be using those leftovers for another meal! Below are my recipes!!

Sauteed Swiss Chard with Bacon & Onion
(serves 3-4)

4 slices of bacon, diced
1/4 of a large onion, diced
1 large (or 2 small) cloves of garlic, minced
1/4 cup of white wine (I used champagne because I had some!) or chicken/veggie broth
1 bunch of swiss chard, stems removed & chopped
Salt & Pepper

1) In a saute pan, start cooking up the diced bacon at medium high heat.  No need to add any oil because the bacon will give off bunches of oil! Keep cooking until the bacon starts getting brown on the edges.
2) Add the diced onions.  Keep cooking until the onions start sweating it out, and the bacon continues to get more brown.  Then add the minced garlic.  Cook for a few minutes, don't let it go too long or the garlic will get bitter. If you want to add a little heat, feel free to add some crushed red pepper here too!

3) Turn the heat down to medium.  Pour in the white wine or broth, use it to help pick up all the browned bits at the bottom.  *please note, please be careful using alcohol if you are using a gas stove.  Remove the pan from the gas burner, then pour in alcohol, and return it to the burner.  Or else you will have a wonderful flaming show!*
4) Add the swiss chard to the pan.  When I rinsed the swiss chard, I didn't let the leaves totally dry so that the water can also assist the cooking.  Sprinkle a little salt (the bacon adds plenty of salt) and pepper.  Put a lid on the pan and let the swiss chard cook down.  Check it every few minutes and toss it around so the yummy flavors soak in it! The dish is done once the stems and leaves are softened!


Ginger Orange Beets
(serves 2)

To Roast the Beets:
6 small beets (or a few large ones)
Olive Oil
Salt & Pepper

For the Vinaigrette:
4 tablespoons of olive oil (or any oil you have)
2 tablespoons of rice wine vinegar
Zest from half of an orange
2-3 tablespoons of fresh orange juice (from the half you zested)
1/2 teaspoon of minced ginger
Salt & Pepper
1/2 orange, segmented

1) Preheat the oven to 425 degree fahrenheit.  Cut the tops and bottoms off of the beets, wash them with a wet paper towel.  Since the beets were so small I put them in a foil packet all together.  Rip off a piece of foil, put the beets on there, drizzle a little olive oil and salt & pepper.  Fold up the foil and make a packet, but leave air around the beets.

2) Put the packet on a sheet pan and roast them in the oven for about 55 minutes.  If you are using large beets you will have to cook them off a little longer.
3) Meanwhile, make the vinaigrette. Put all of the ingredients, except for the segmented orange, into a bowl and whisk until it emulsifies and creates a smooth dressing.  Cut up the other 1/2 orange into segments (meaning cut around the skin so you just have the yummy pieces of fruit) put that into the vinaigrette.
4) Once the beets are done and have been cooled, use a paper towel or a dish towel you don't mind turning hot pink, and rub off the skin.  It will come easily off.
5) Cut the beets into quarters, and add to the dressing and toss.  This salad can be served warm or cold.


Monday, June 24, 2013

Homemade Larabars

My husband and I, around a year ago, were obsessed with larabars.  We eventually grew sick of them, and stopped eating them.  I was on 100daysofrealfood.com and she talked about how homemade larabars are amazing compared to the store bought.  So I thought I'd give it a shot, and create my own recipes based on hers.  I tried an Apple Pie Larabar, but it was a bit mushier than I wanted, so I want to continue to tweak that recipe.  BUT my Coconut Cream Pie one came out AMAZING.  I'm obsessed with coconut, hubby on the other hand, not so much.

Coconut Cream Pie Larabar

Makes about 8 bars (more/less if you want bigger or smaller bars!)


1 cup of dates
1/2 cup of almonds (I used sliced because that is what I had)
1 cup of unsweetened shredded coconut
1 tablespoon water

1) Put all of the ingredients in a food processor (the picture to the right is the apple pie one), and blend it until all the ingredients are mixed together.  It forms sort of a sticky mass. You may need more water, just watch it as you blend it.
2) Pat out the mixture into a square, and cut into squares, rectangles, or roll into balls!
3) For longer storage keep it in the fridge.  It also makes them a bit firmer too, if you end up adding too much water.


P.S. I find that bulk nuts are much more cost effective than the ones pre-bagged.  Take a look at your grocery store and see if you can save any money!

Thursday, June 20, 2013

I'm Back

Hey All!
Sorry I haven't been around for a while, but summer is here and so are the fresh fruit and veggies!!!  I found a local co-op that does a weekly share for fruit, vegetables, and flowers.  I opted into the fruit and veggies.  This is my first week of produce, it looks sooo yummy!! 


This included:
Swiss chard
Green lettuce
Tomatoes
Beets
Cabbage
Asparagus
Strawberries

I am creating dinners solely based on these veggies, so stay tuned for my creations!!!